In Chapter 1 you formed an LLC so there's one clean legal box your money flows through. Now you've shipped more than one thing — a Mac app on a subscription, a small web tool, maybe a second app on the way. A question shows up fast:
Do all of these share one Stripe account, or does each product get its own?
The wrong answer is "I'll figure it out later," because payments data is the one thing that's genuinely painful to reorganize after customers are paying. This chapter shows the pattern most indie multi-product shops land on: one legal entity, one Stripe Organization, and a separate Stripe account per product. You'll learn when the split is worth it, how to set it up, and how to migrate a product that's already taking money — without billing anyone twice.
One account or many?
Stripe lets you put many products and prices inside a single account. So technically one account can sell your Mac app subscription, a one-off web tool, and a future product all at once. The question is whether you want them tangled together.
Here's the trade-off, plainly:
| One account, many products | One account per product (under an Organization) | |
|---|---|---|
| Setup effort | Lowest — nothing new to create | One organization + one account per product |
| Payouts | One schedule, one bank line item | Separate schedule and bank line per product |
| Receipts & branding | Shared statement descriptor & emails | Each product brands its own checkout / receipts |
| Books / P&L | You split revenue by product in spreadsheets | Each product is already its own clean P&L |
| Risk isolation | A dispute spike on one product can threaten all processing | A problem on one account is contained |
| API surface | One secret key, one webhook, one set of price IDs | Separate keys / webhook / prices per product — more to wire |
| Selling / handing off a product | Painful — you must untangle shared data | Hand over (or shut down) one account cleanly |
The short version: if two products share customers and you think of them as one business, keep them in one account. Add-ons, tiers, and bundles of the same product belong together. But the moment a product has its own brand, its own buyers, its own risk profile, or any chance you'll sell or spin it off — give it its own account.
What a Stripe Organization actually is
An Organization is a container that sits above your accounts. You sign in once and switch between accounts from the account switcher in the top-left of the Dashboard. Here's that switcher — this is the whole feature in one screenshot:

Figure 1 — The organization (Your Company, LLC) is the top-level container. Under it sit individual accounts — here, the flagship company account and a separate Your Second App account. The Create menu is where you add another account or spin up a whole new organization.
What the organization gives you, for free, across every account inside it:
- One login and one team list. Add a teammate or contractor once, grant them access to specific accounts, and manage everyone (and SSO) from the organization level.
- Consolidated reporting. Search and download reports across all accounts at once — no integration changes required — so you can still see total revenue across products.
- A single place to switch contexts instead of juggling separate logins and password managers.
What it deliberately keeps separate, per account:
- API keys (each account has its own
acct_…id, its own secret key) - Products, prices, customers, and subscriptions
- Payout schedule and destination bank account
- Radar fraud rules and dispute history
- Checkout branding, statement descriptor, and email receipts
- Webhook endpoints and signing secrets
Same entity, separate accounts
This is the part that confuses people: separate Stripe accounts do not mean separate businesses. Every account under your organization can point at the same legal entity — the LLC you formed in Chapter 1.
In practice that means each account's business profile carries the same legal name, the same EIN, and the same business address. Stripe still verifies each account individually (it'll ask for the entity details when you create it), but you're attesting to the same company every time. A few consequences worth knowing:
- Tax reporting is per account. Stripe issues a 1099-K per account that crosses the reporting threshold, all under your LLC's EIN. Your accountant sums them; the organization's consolidated reports make that easy.
- Payouts can share or split a bank account. Point every account at your one business checking account, or give each product its own sub-account if you like clean bank statements. Your call.
- Verification is faster the second time. You're entering the same entity details you already gave for the first account, so each new account clears KYC quickly.
Setting it up
There are two phases: create the organization once, then add a new account every time you launch a product. Both run from the account switcher in the top-left of the Dashboard. Here's the real flow, screen by screen.
Phase 1 — Create the organization
1. Open Organizations. Click the account switcher and choose to create an organization. Stripe spells out what one buys you: global search with consolidated customer and transaction lists, centralized team management with SSO, and unified reports (even custom SQL) across every account. Click Get started.
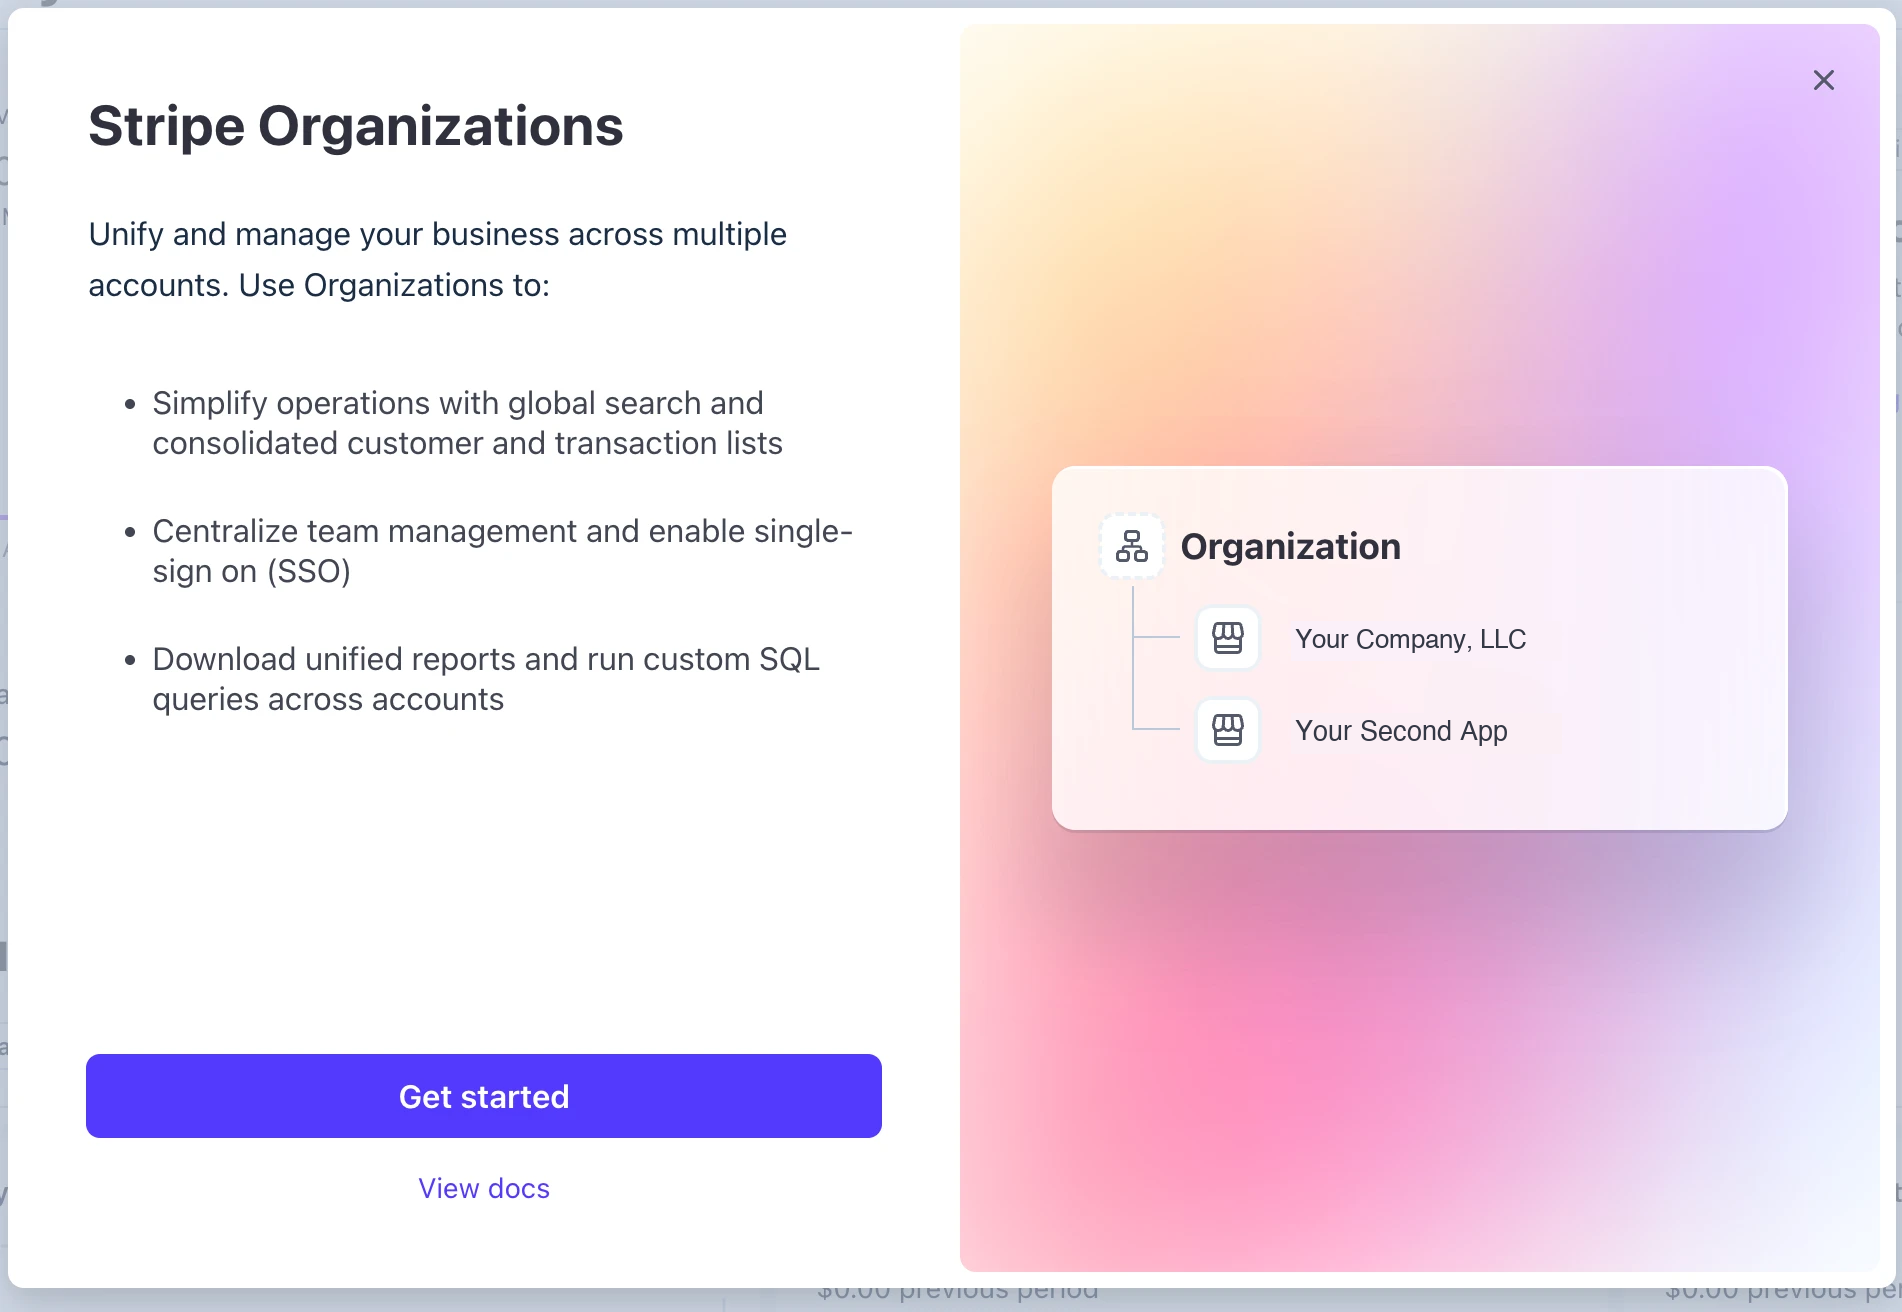
Figure 3 — The Organizations intro: one login, consolidated reporting, and centralized team management across every account. Click Get started.
2. Name your organization. Name it after your legal entity — Your Company, LLC — so the top-level container matches the name on your tax return. You can rename it anytime. Click Next.
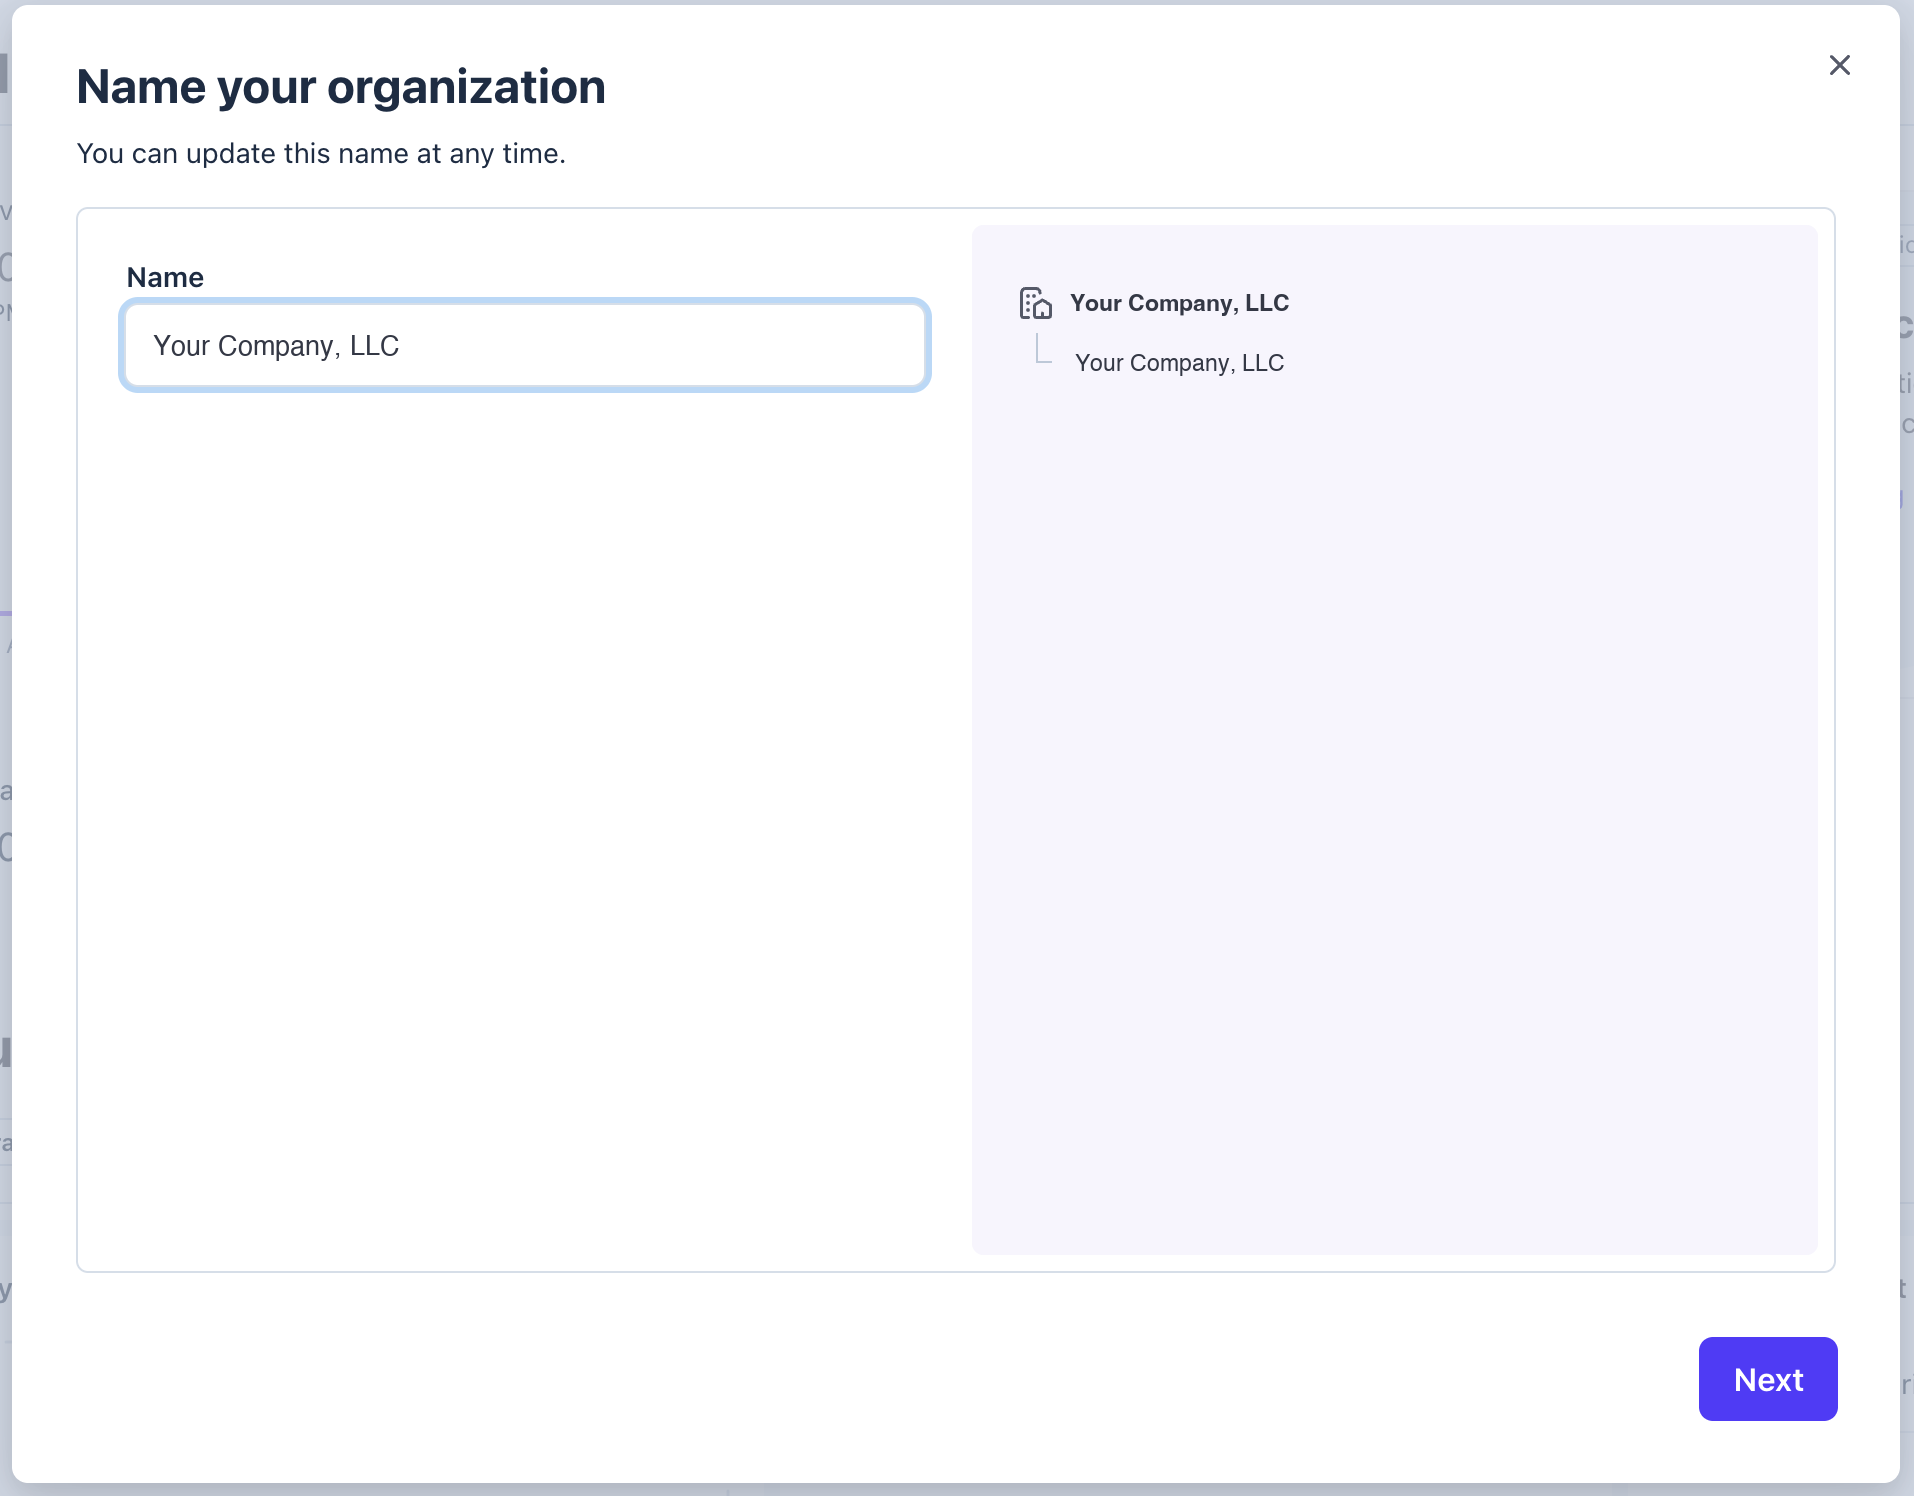
Figure 4 — Name the organization after your legal entity; the preview shows your accounts nesting under it.
3. Add your existing accounts. Stripe lists every account where you're the Super admin or Admin. Select all the product accounts you want grouped under this entity — your flagship app, your second app, anything else — then click Create. (Creating the organization accepts Stripe's Terms of Service.)
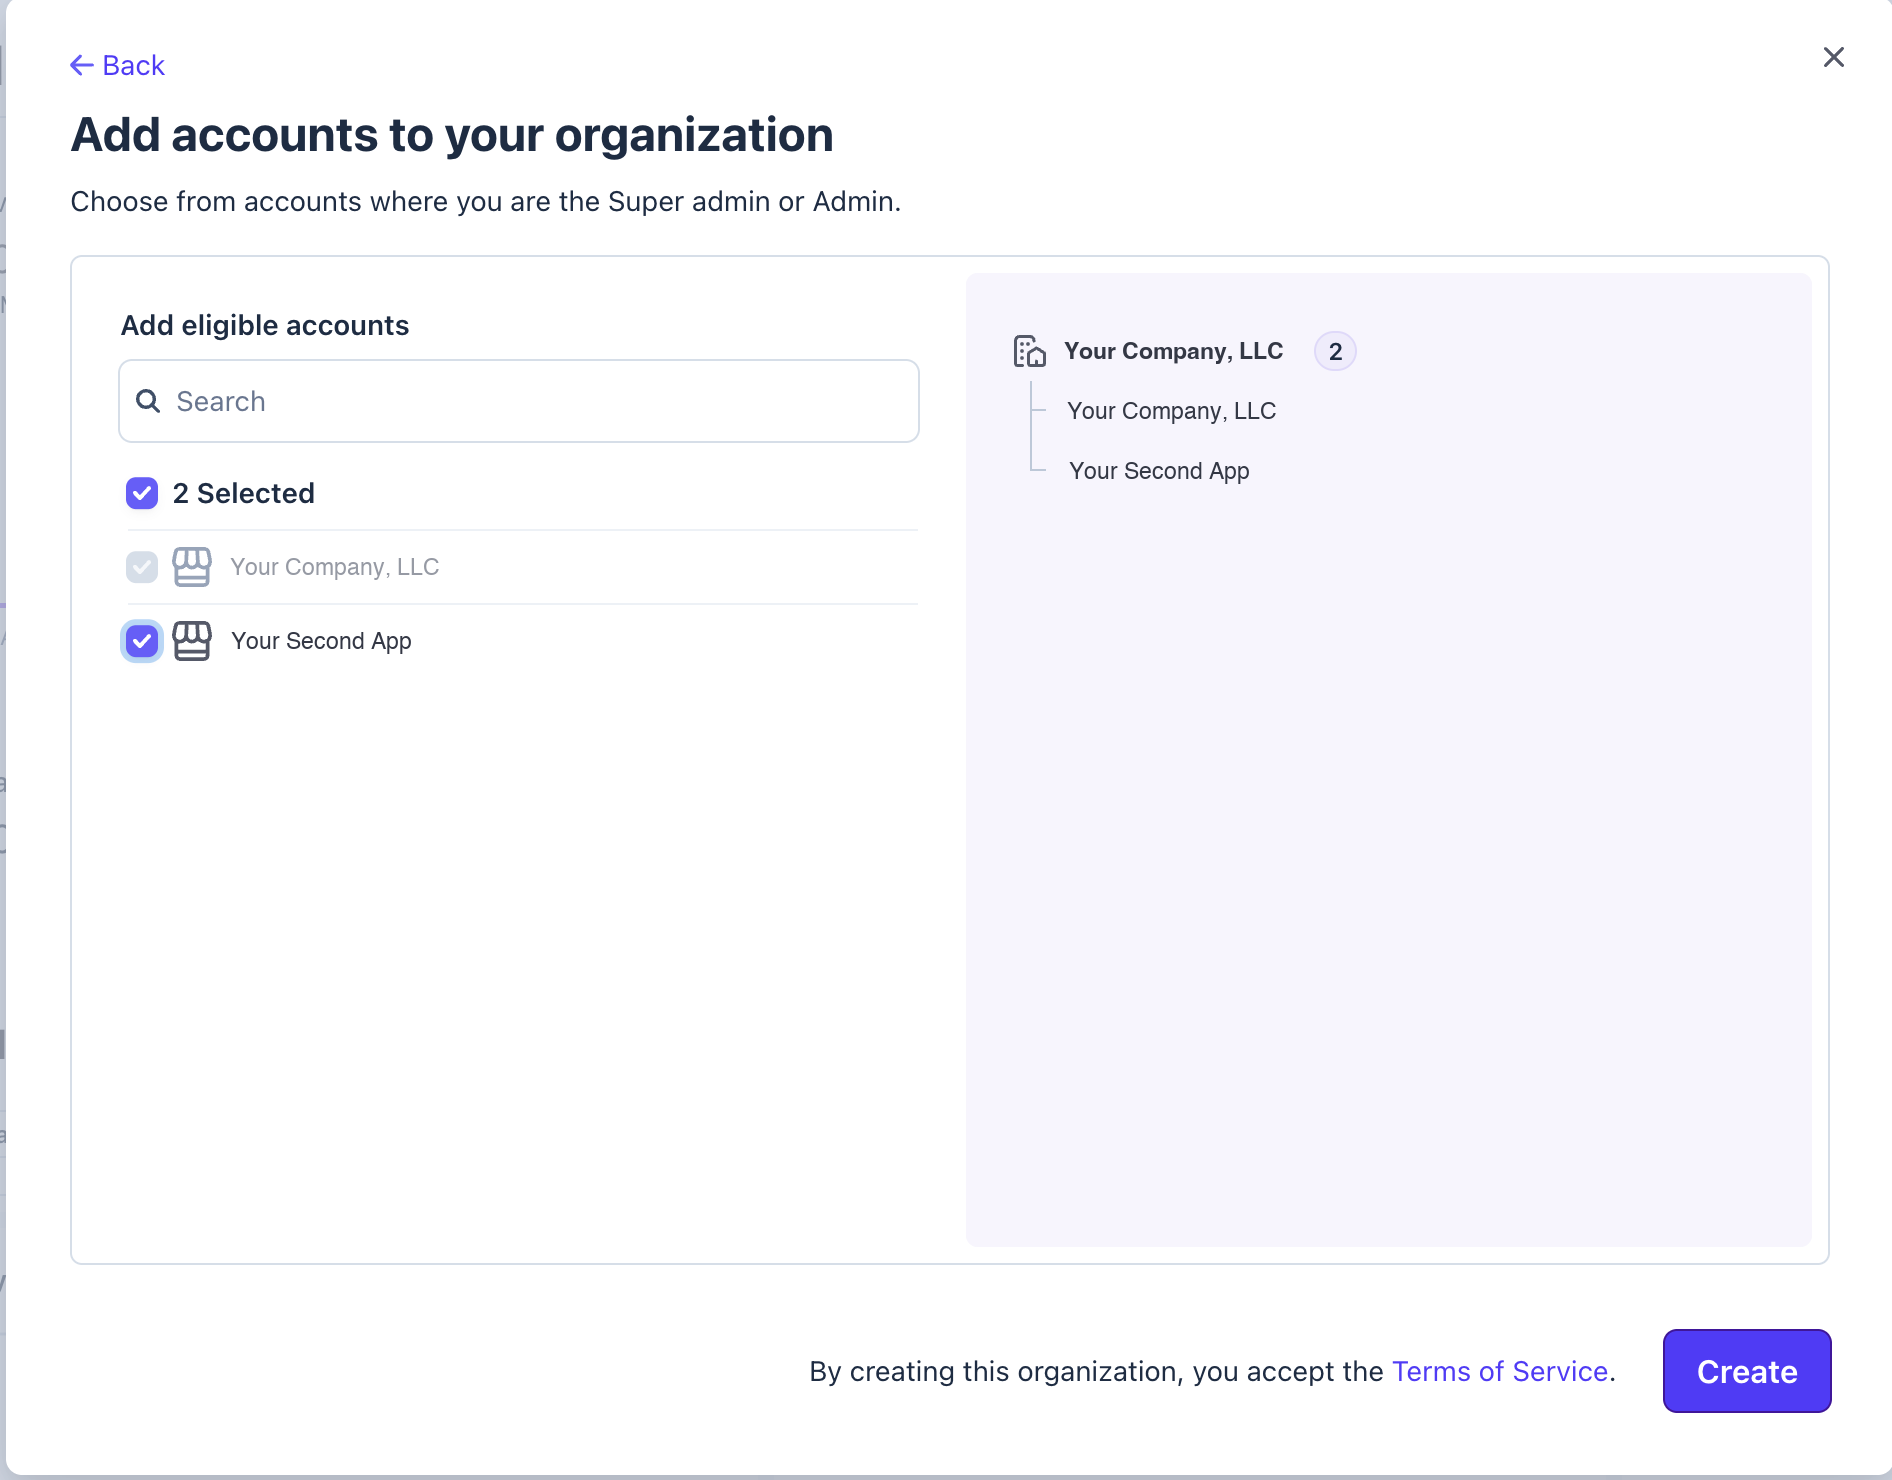
Figure 5 — Select every product account you want grouped under the entity, then Create.
4. You're organized. The switcher's top-left now reads Your Company, LLC · Organization with an "N accounts" link, and the dashboard gains an Organization performance panel — consolidated gross volume across every account. That single roll-up is the consolidated-reporting benefit, live.
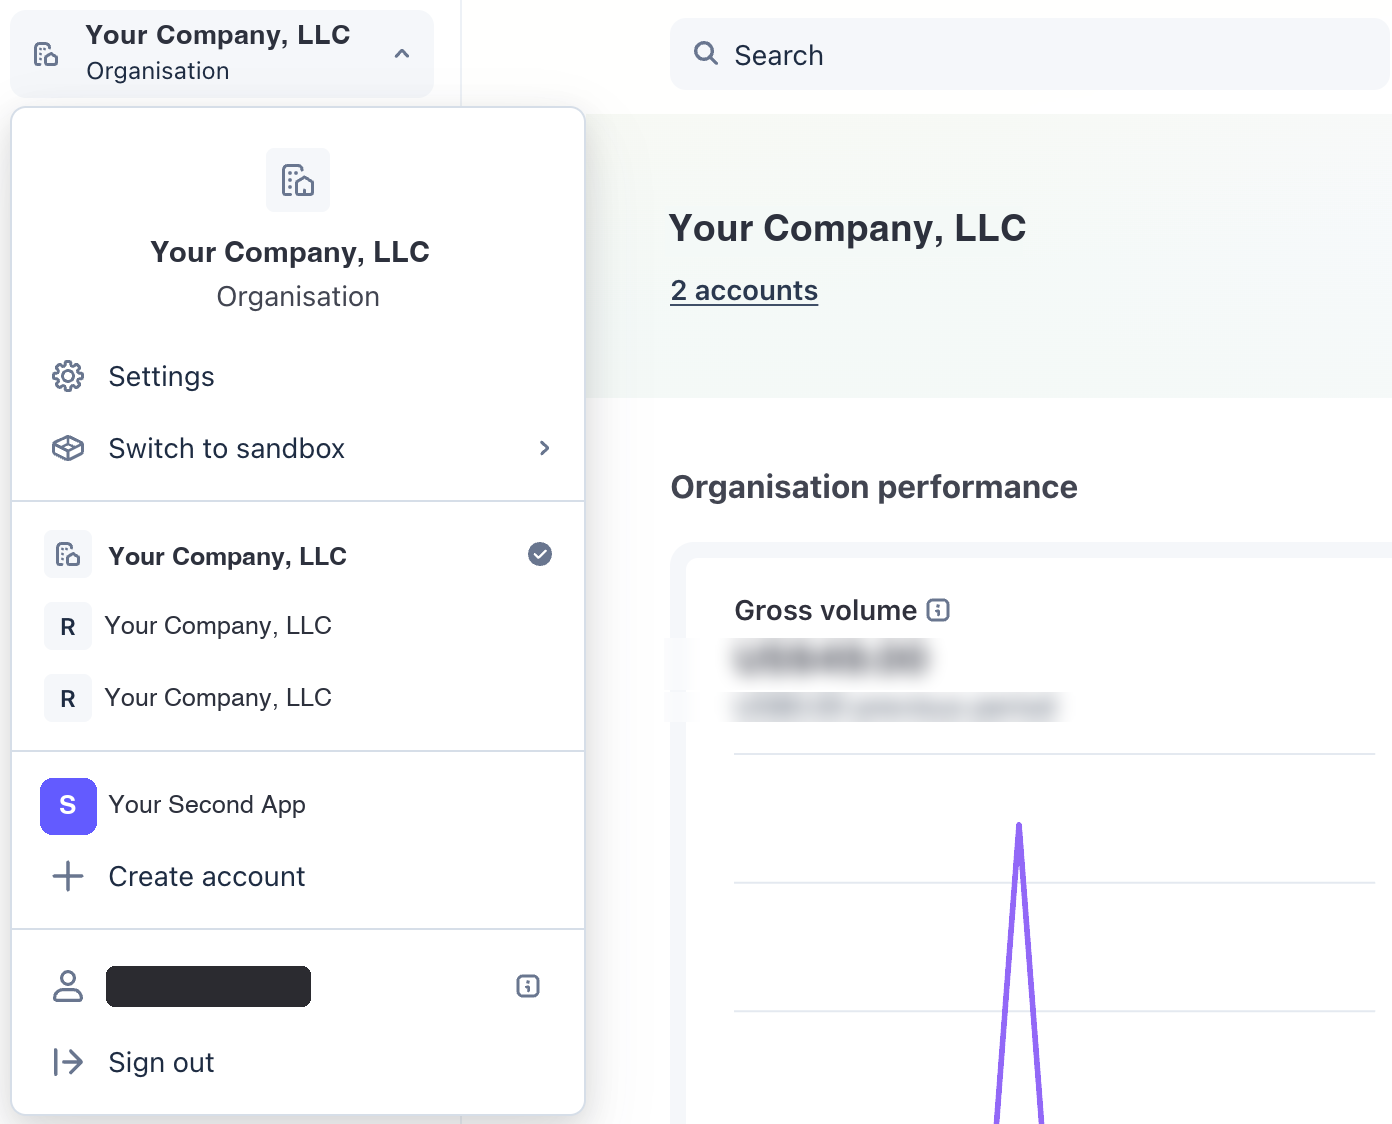
Figure 6 — Once the organization exists, the switcher's top-left flips to show it, every account is grouped underneath, and the dashboard gains a consolidated Organisation performance roll-up across all of them.
Phase 2 — Add a new product as its own account
Every time you launch something new, give it its own account inside the organization.
5. Create account → inside your organization. From the switcher choose Create account. Stripe asks how to organize it:
- Create an account in your organisation — shares data, team members, and reporting with the org. Choose this for another product under the same LLC.
- Create a separate account — won't share data, team, or reporting. Only for a genuinely unrelated venture.
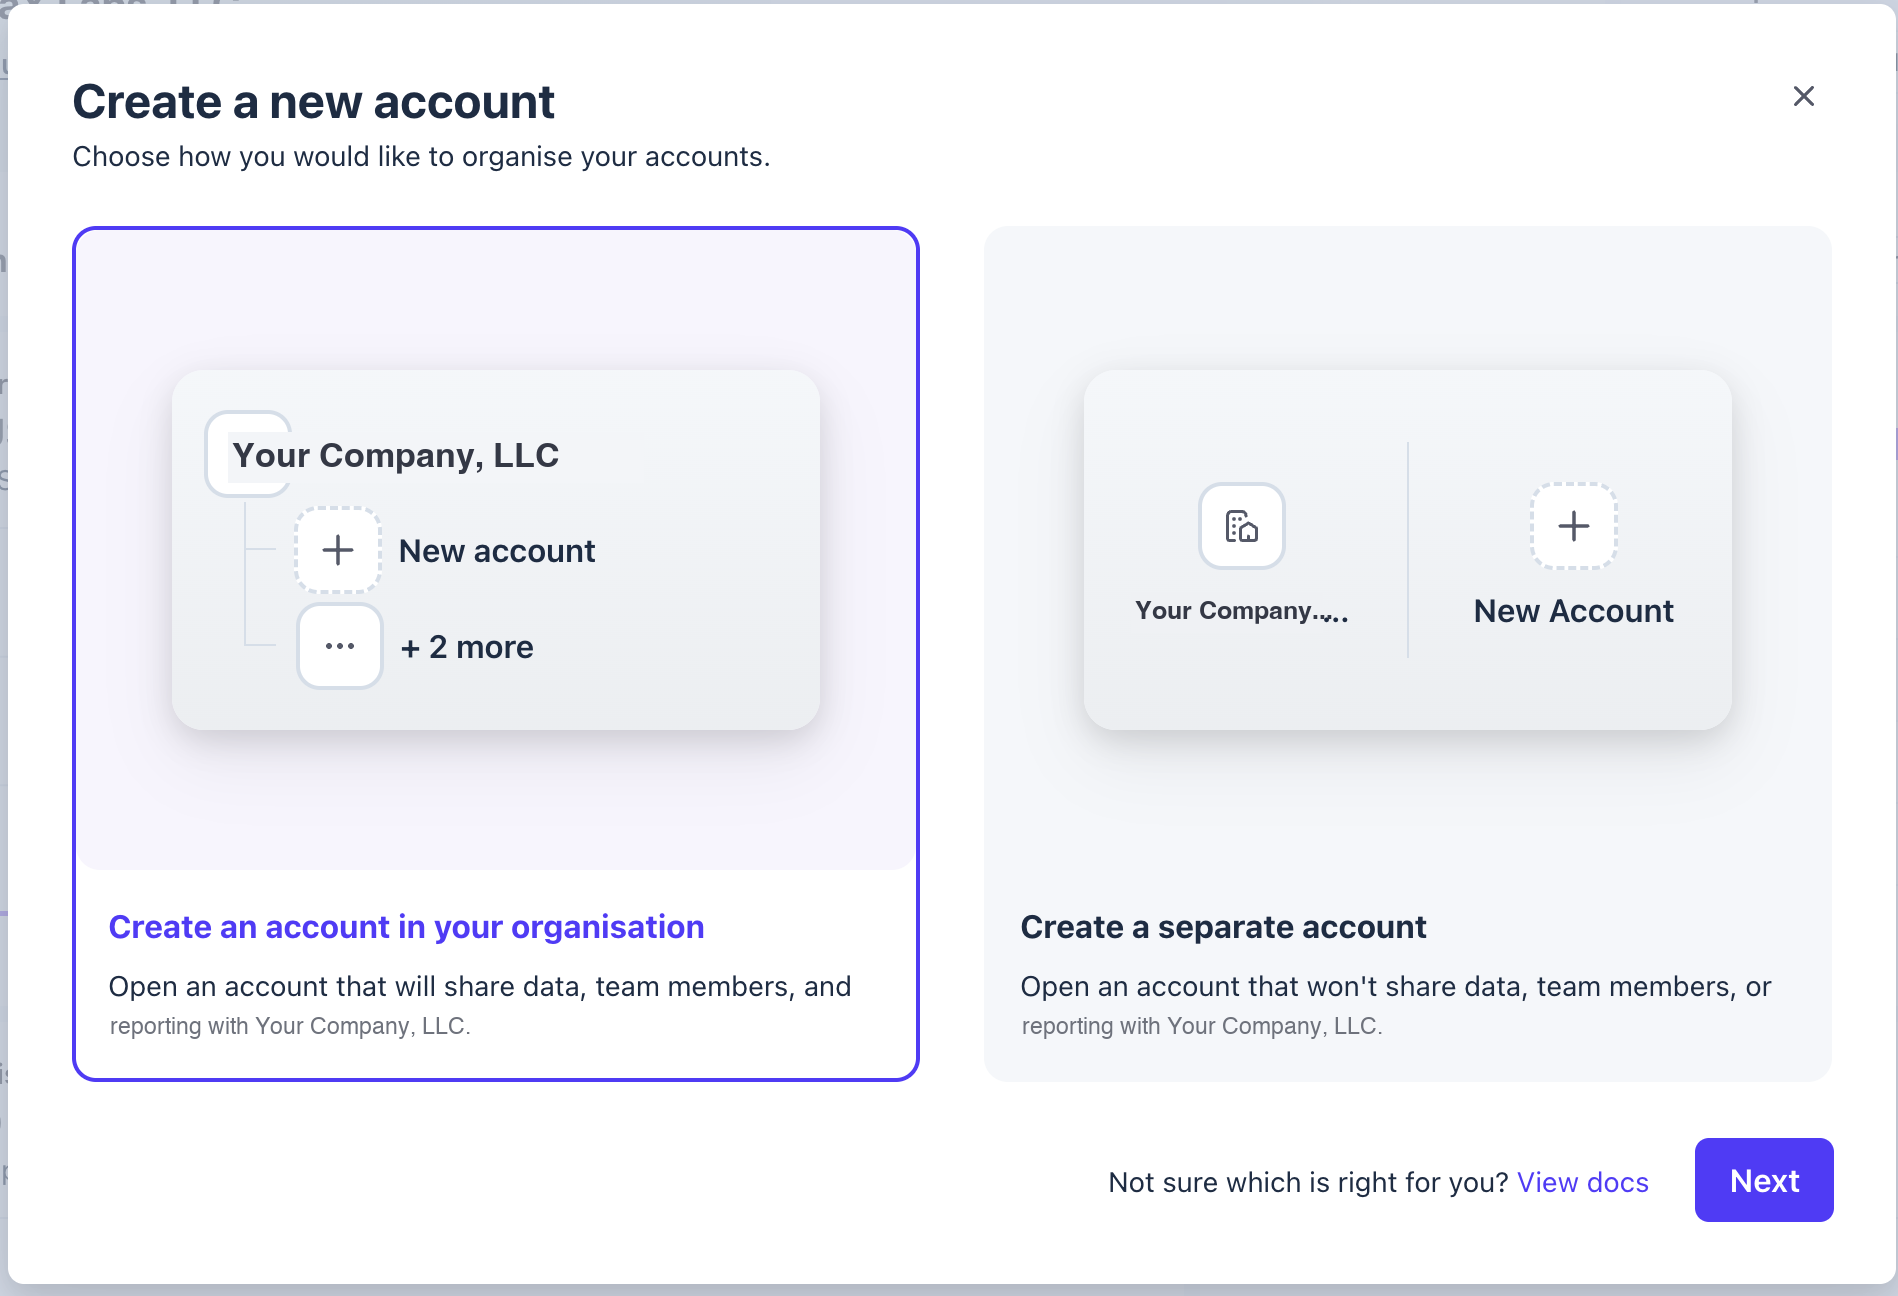
Figure 7 — Pick Create an account in your organisation (left) so the new product shares team and reporting with the rest of your entity — not a fully separate account.
6. Name it after the product. Use the product's own name: if the site is yourproduct.com, name the account YourProduct. A readable account name keeps the switcher sane once you have several. Pick the Country of operation, then Next.
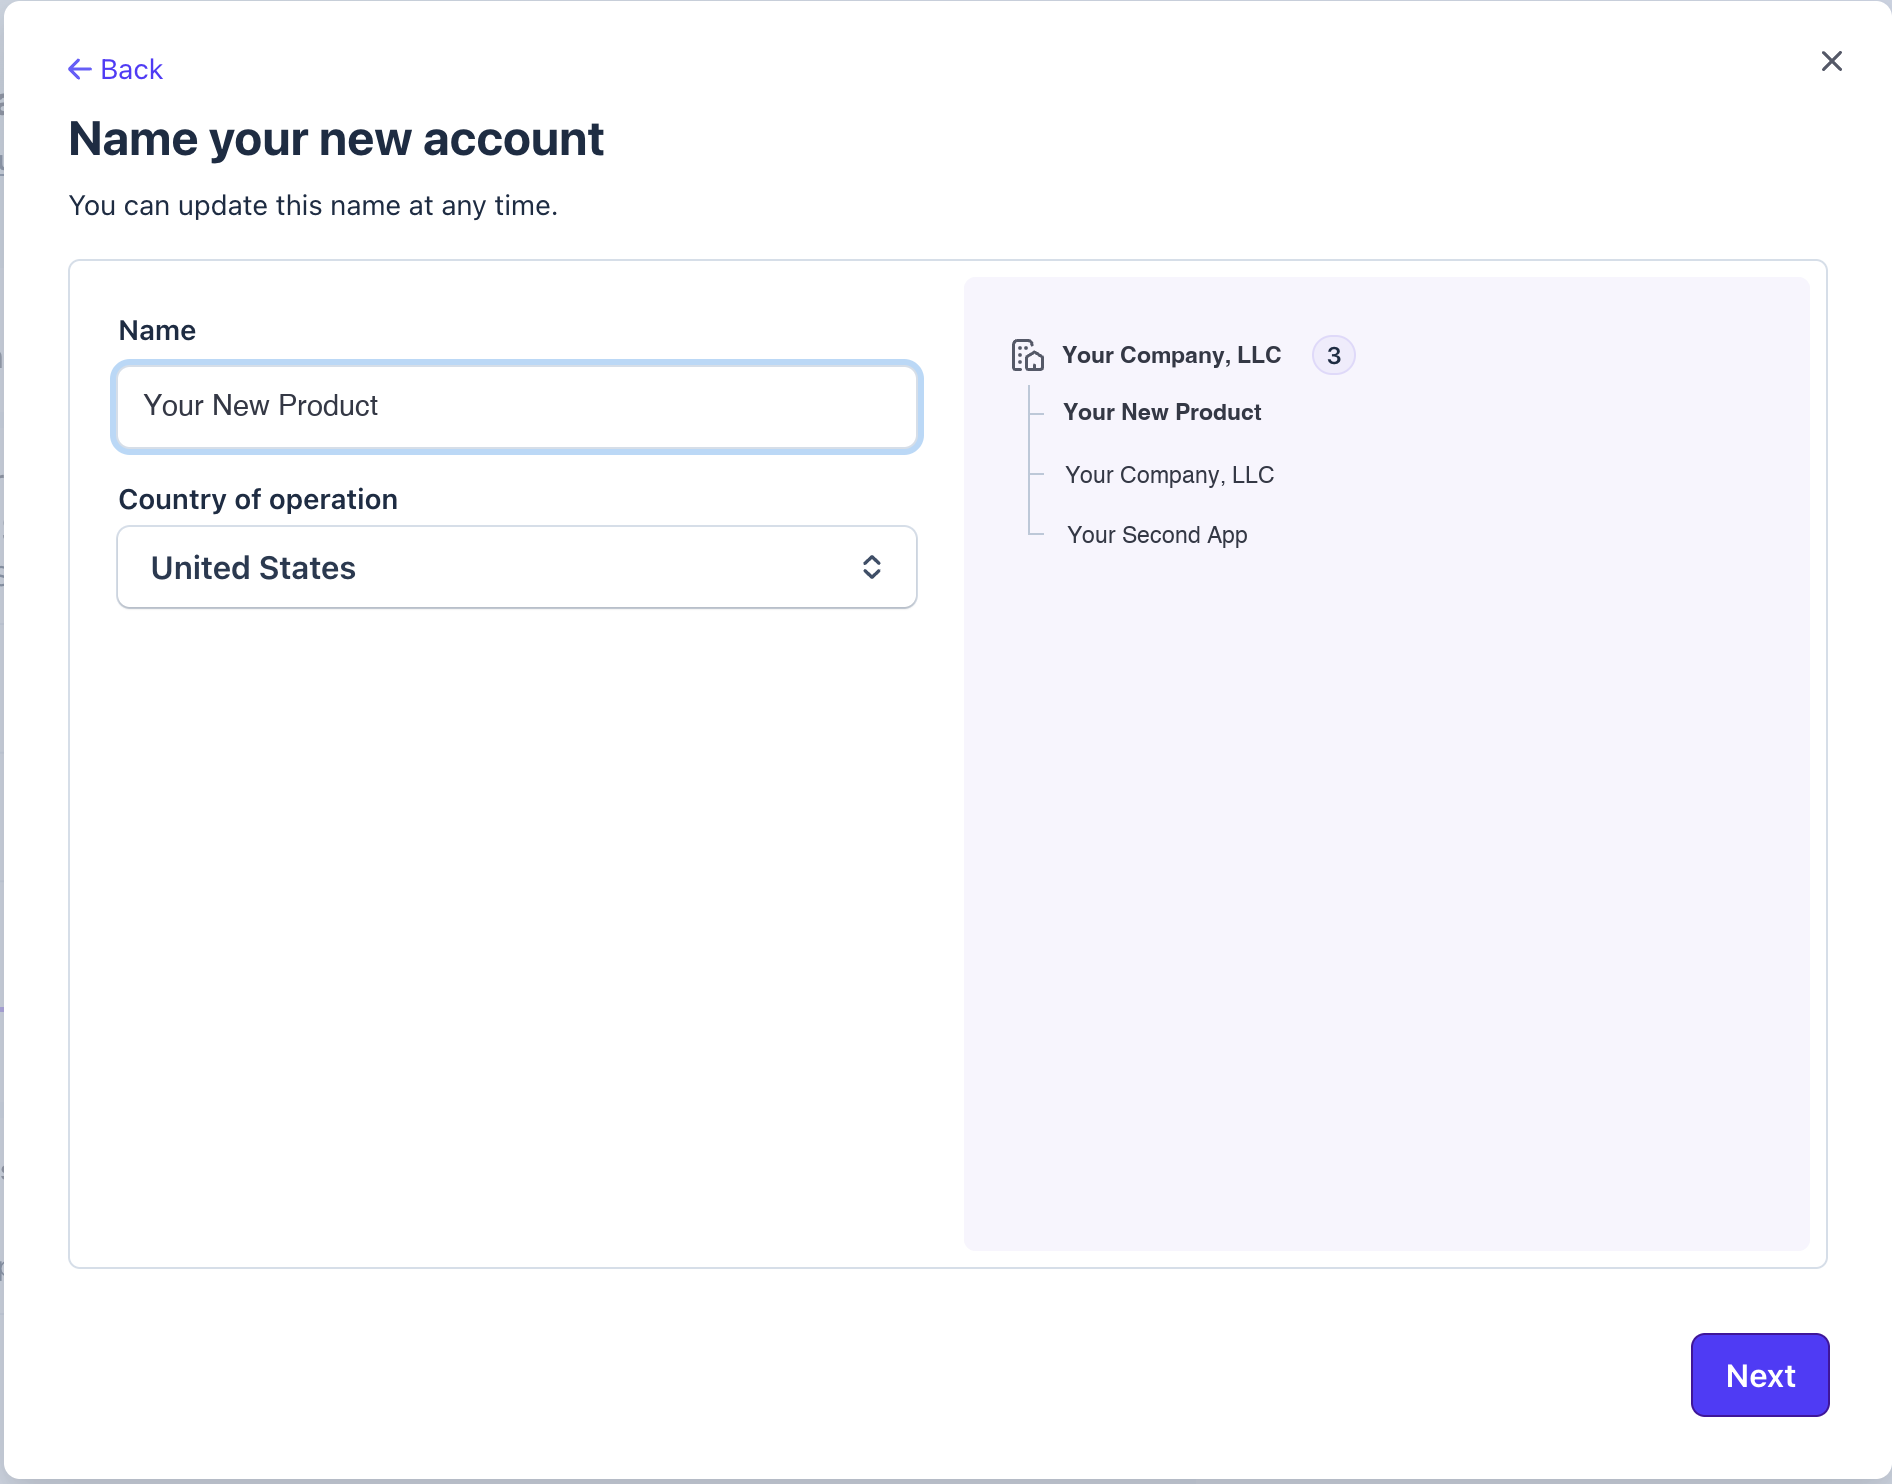
Figure 8 — Name the new account after the product (here, Your New Product), not the LLC — this is the customer-facing operating name. Pick the country, then Next.
7. Bootstrap from an existing account. Stripe offers to copy eligible details from an account you already have, so you don't re-key everything:
- Management and ownership → set to your LLC. This is the whole point: the same legal entity owns every account.
- Public account details → copy as a starting point, then edit the name and support info to the new product.
- Use this account's branding → see the decision below.
- Payout bank account → reuse the LLC's bank (simplest — one entity, one bank), or add a product-specific account if you want clean per-product bank statements.
Then click Create account.
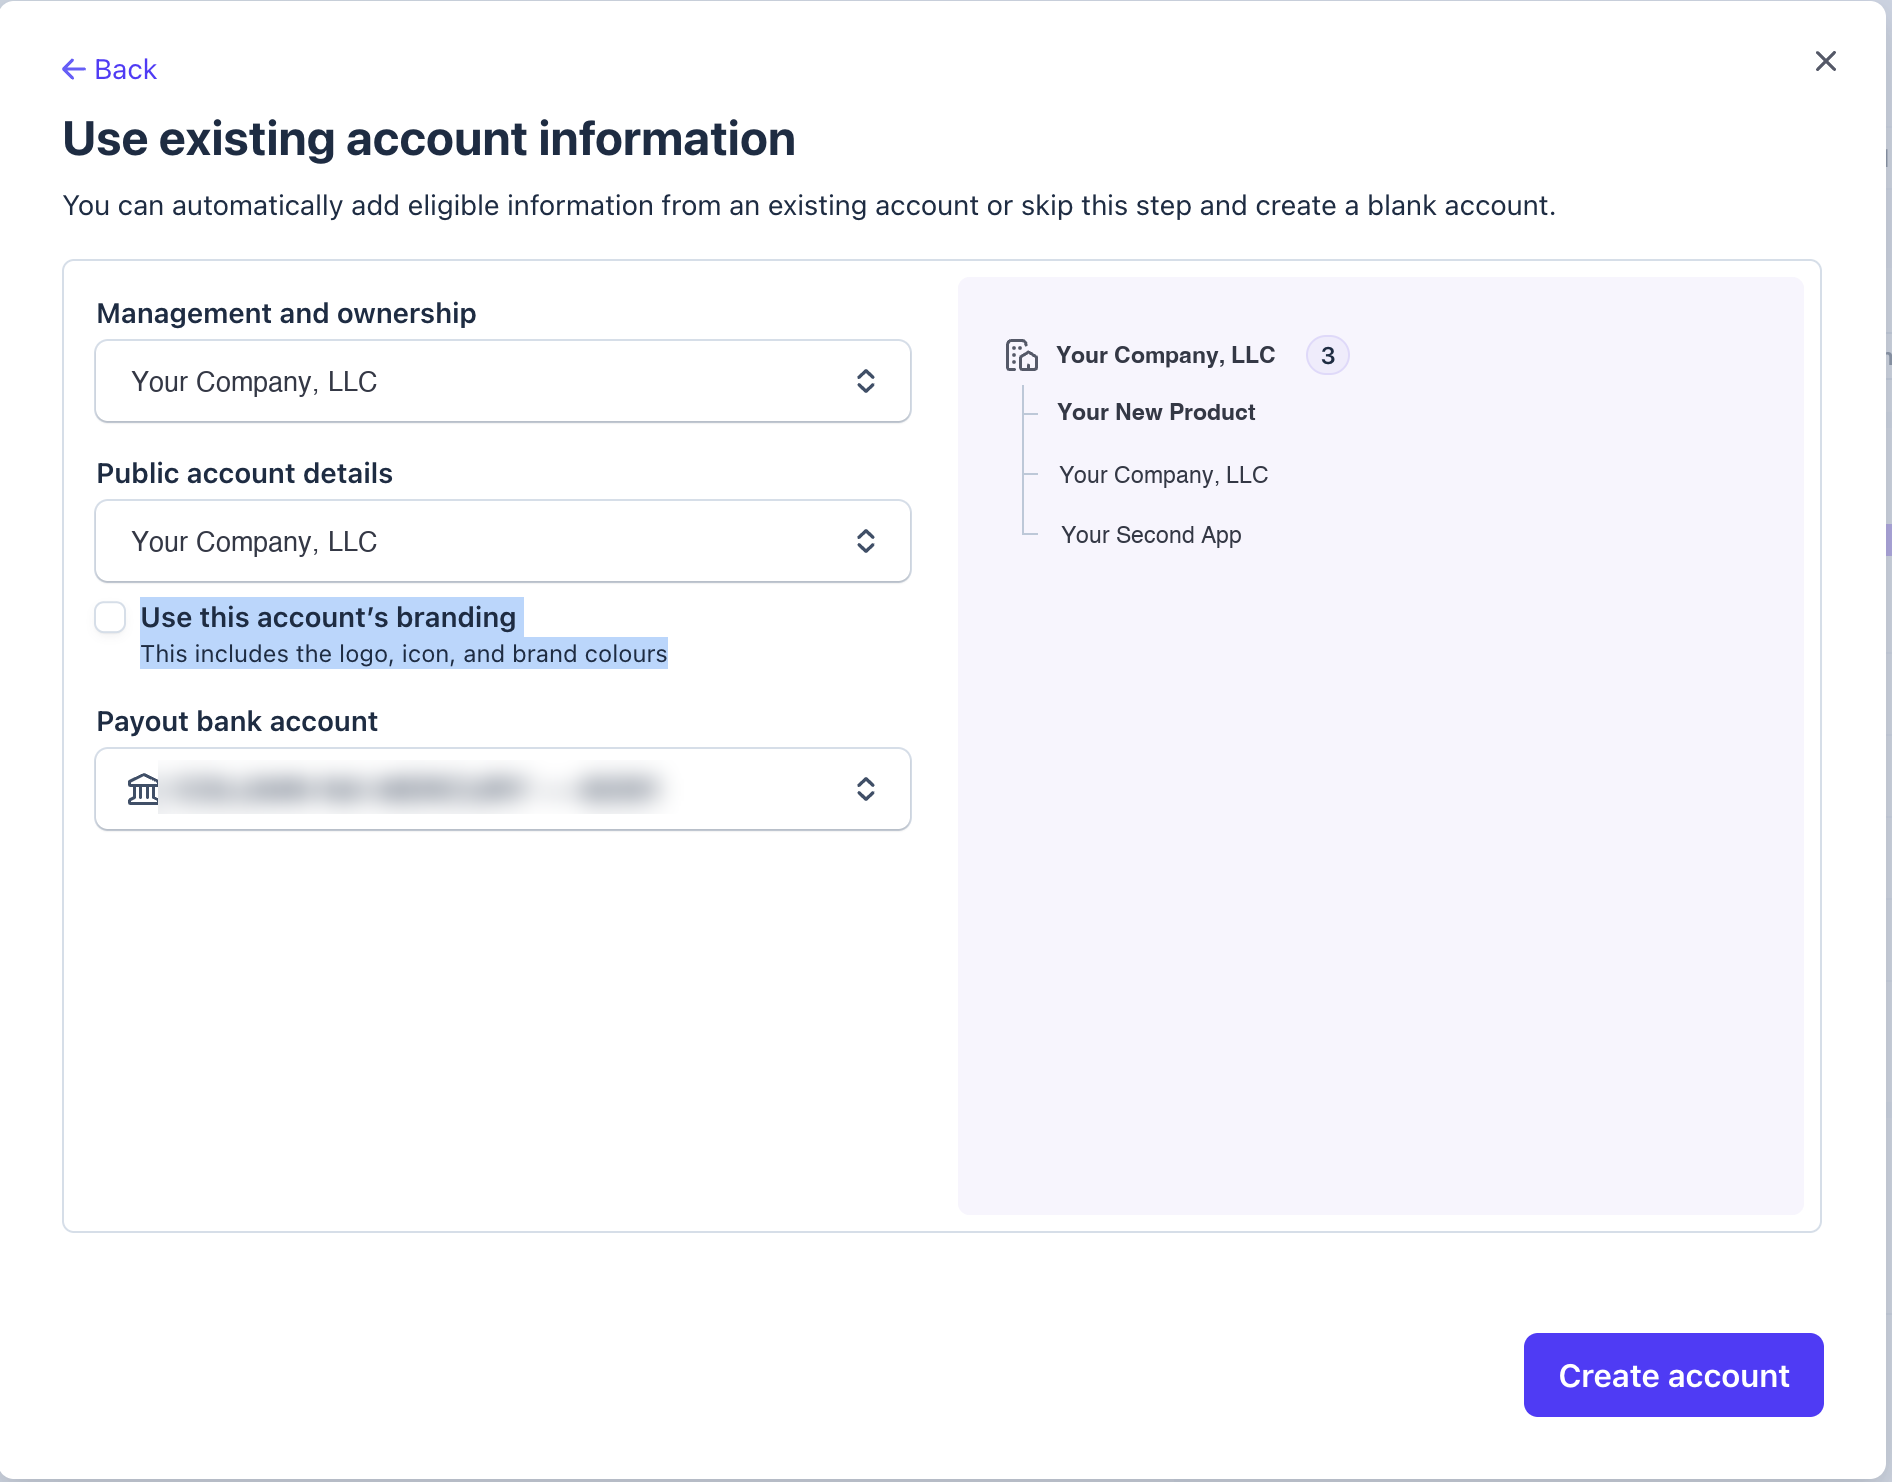
Figure 9 — Bootstrap from an existing account: keep Management and ownership on your LLC, decide on branding, and pick the payout bank — then Create account.
8. Activate it — finish the Setup guide. Creating the account doesn't make it live. Each new account gets its own activation checklist: the Setup guide (bottom-right of that account's Dashboard) walks you through verifying your business — your LLC's details, a business representative, and a bank account — before Stripe will accept real payments. Same legal entity as your other accounts, so the details match, but Stripe verifies each account independently. Click into the Setup guide, work through the steps, and the account flips from test-only to live.
Managed Payments also asks you to classify what you sell — "Tell us what you sell most." The category (SaaS for business use, SaaS for personal use, a downloadable game, and so on) tells Stripe how to tax the product, since digital goods are treated differently across jurisdictions. Pick the one that fits best — you can override it per product later.
Stripe then asks which products to enable. These are just capabilities — switch them on freely, since enabling one commits you to nothing and you can add or remove later. For an indie product, turning on all of them is fine:
- Non-recurring payments — one-time charges through a checkout page or invoice. Your "buy once" path: a single purchase, a one-off unlock, a digital download.
- Recurring payments — subscriptions and usage billing. The engine of most indie SaaS; your
$7.99/moPro tier lives here. - Invoicing — create, customize, and send invoices with a pay-online link. Handy for one-off client work or B2B deals that need a proper invoice.
Turn on recurring payments and Stripe asks how you want to bill — pick the model that matches your customers:
- Flat rate — a fixed fee per customer (e.g. a
$50/monthmembership). The B2C default: one price, one subscriber. - Seat-based — per-user pricing (e.g.
$10/month × 5 users = $50). This fits B2B tools sold to teams.
Selling a consumer app? Flat rate. Selling a team tool billed per user? Seat-based.
Choosing your payment integration
Stripe then asks how you want to accept payments. The two options in the Setup guide — Shareable payment links and Prebuilt checkout form — are just the entry point to a broader spectrum that runs from no-code to fully custom. Here's the whole lineup so you can pick deliberately:
| Integration | Code level | Where it lives | Best for |
|---|---|---|---|
| Payment Links | No-code | Stripe-hosted URL | Share a link over email / SMS / social — no website needed |
| Checkout — hosted page | Low-code | Stripe-hosted (redirect) | Most products; Stripe's recommended starting point |
| Checkout — embedded form | Low-code | Embedded on your site | Keep customers on your domain, no redirect |
| Payment Element (Elements) | Custom | Embedded on your site | A fully custom checkout UI you design |
| Direct API | Fully custom | Your infrastructure | Bespoke or legacy flows; maximum control |
The trade-off is always the same: the more Stripe hosts, the more it handles for you — PCI compliance, 125+ payment methods, subscriptions, tax, Link, promotions — and the less you customize. Walking the list:
- Payment Links — generate a URL, share it anywhere, done. Zero code. It's exactly how this project sells its Mac app: a
buy.stripe.com/…link, no checkout page to build. - Checkout (hosted page) — Stripe's recommendation and the most features for the least code. You create a Checkout Session in a few lines; Stripe renders the page and handles the rest. Customers briefly leave your site for
checkout.stripe.com. - Checkout (embedded form) — the same Checkout engine, but the form mounts on your own page so customers never leave. This is the pick when you're embedding payments into your website (the Prebuilt checkout form option) — you still get Stripe's PCI handling and payment methods, with more styling control via the Appearance API.
- Payment Element — Stripe's embeddable UI components for a custom checkout, fully styled with CSS. You assemble the flow; Stripe still secures the card field. Reach for it only when Checkout's branding isn't enough.
- Direct API — wire
PaymentIntentsyourself for total control. Most indie products never need this.
Rule of thumb: start at the top of the table and only move down when a real requirement forces you to. For a website, embedded Checkout is the sweet spot — your domain, Stripe's compliance, minimal code. Full details and code samples are in Stripe's Checkout docs.
The activation checklist runs Verify your business → Add your bank → Add extras → Review and submit. The extras are optional — for example Stripe Climate, which directs a small fraction of revenue (default 1%) to permanent carbon removal and shows a badge at checkout. Pick a percentage or skip it entirely; it's changeable anytime.
Submit the checklist and — for most low-risk businesses — review is often instant: you land straight on the You're now in your live account screen. Stripe then offers to copy your sandbox setup over (products, prices, webhooks, branding) so you don't rebuild it by hand, or to start clean. If you built and tested in test mode first, Choose what to copy is the real time-saver.
9. Brand and wire the new account. After it's created, set its statement descriptor (what shows on a card statement), logo, and checkout colors in Settings → Branding. Then grab its own secret key, publishable key, webhook signing secret, and price IDs / Payment Link URLs to wire into your app — kept strictly separate per product (see the next section).
Migrating a product that's already taking money
Creating a brand-new account for a brand-new product is easy. The hard case is splitting an existing product out of a shared account into its own when it already has live subscribers. Here's the honest truth Stripe won't put on a billboard: you cannot move a product between accounts with one click. Accounts are isolated by design.
What can and can't cross between two of your own accounts:
- Copies over (with Stripe's help): your Customers and their saved cards / payment methods. You file a request and Stripe securely copies them from the old account to the new one. It's a copy, not a move — the old account keeps its data — and it can take anywhere from a day to a couple of weeks. Customer IDs are preserved; the underlying card details stay the same even though their internal payment-method IDs change.
- You recreate yourself: Products, Prices, Subscriptions, and Coupons. None of these copy automatically. You rebuild the catalog in the new account and re-establish each subscription against the copied cards (Stripe's Billing migration toolkit in the Dashboard is built exactly for re-creating subscriptions, including from another Stripe account).
- Stays behind entirely: historical charges, invoices, events, and logs. They live forever in the old account for your records.
There are two sane ways to do this. Pick based on how many live subscribers you have.
Strategy A — Parallel cutover (best when you're small)
If the product just launched and has a handful of subscribers, don't bother with a formal data copy at all:
- Stand up the new account and rebuild its catalog (products, prices, Payment Links).
- Point all new signups at the new account today.
- Let existing subscriptions keep billing in the old account until they renew or churn.
- Optionally nudge current subscribers to re-subscribe on the new account (a small thank-you/discount helps).
- When the old account's last subscription lapses, archive it.
Zero PCI paperwork, zero risk of double-charging, and you're cut over in minutes. The only cost is that the old account lingers for one billing cycle.
Strategy B — Full copy (when real revenue is at stake)
When you have enough subscribers that asking them to re-subscribe would lose you money, do the supported migration:
- Build the new account's catalog (products + prices) so there's somewhere to land.
- Request Stripe to copy Customers + card data from the old account to the new one. Wait for confirmation (days to weeks — plan around it).
- Use the Billing migration toolkit to recreate subscriptions in the new account against the copied payment methods. Preserve each subscription's billing anchor so renewal dates don't shift.
- Cut over carefully to avoid double billing: as each subscription goes live in the new account, set the matching one in the old account to cancel at period end (not immediately — let the current paid period stand). Reconcile the two lists so no customer is active in both at once.
- Repoint your app's keys, webhook, and price IDs to the new account (next section). Keep the old account read-only for history.
How many accounts — and reusing one when a project dies
A few questions come up once you're comfortable spinning up accounts:
How many can one organization hold? Up to 75 accounts, and each account belongs to exactly one organization. For an indie shop that's effectively unlimited — you'll run out of product ideas long before you run out of account slots.
Should an experiment get its own account? It depends how real it is:
- Just testing an idea? Don't burn a live account. Use a sandbox (test mode) inside an account you already have — fake cards, no verification, no commitment.
- Launching it for real under its own domain? Give it its own account. You get a statement descriptor that matches the new URL (fewer disputes), isolated risk, a clean P&L, and the freedom to sell or shut it down on its own. It's the same LLC, so verification is quick the second time — and at 75 slots, one more account costs you essentially nothing.
The experiment flopped — now what? A Stripe account isn't married to a domain, so you can repurpose it for your next project instead of letting it rot:
- Rename it in Settings → Account (the Dashboard label).
- Re-brand it — new logo, icon, and colors in Settings → Branding.
- Update the statement descriptor to the new URL in Settings → Public details. Renaming the account does not auto-update the descriptor — change both.
- Archive the dead products and add the new ones.
Because the legal entity never changes — same LLC, same EIN — Stripe doesn't re-verify you. (The W-8/W-9 only resurfaces if your legal name, tax ID, or business type actually change, which they don't here.)
Wiring your app for multiple accounts
Once each product is its own account, your backend has to stop assuming "Stripe" is a single thing. Take a concrete stack — a Mac app sold through Stripe Payment Links, with a Cloudflare Worker + D1 database flagging who's subscribed (the architecture this very site runs on). To go multi-account:
- One secret key + one webhook signing secret per product. Store them as separate, product-prefixed secrets. The Worker verifies an incoming webhook against the signing secret of the account that sent it — verifying Account B's event with Account A's secret will (correctly) fail.
- One webhook endpoint per account, or one shared endpoint that routes by the event's
accountfield. Separate endpoints are simpler to reason about; start there. - Price IDs and Payment Link URLs are per account. A
price_…from Account A is meaningless in Account B. Keep a small map of product → price IDs so you never cross them. - Subscription state is per product. If a customer can buy two of your products, that's two separate Customer objects in two accounts. If you want a unified "what does this person pay me for" view, key it on their email in your own D1 table and join across products yourself — Stripe won't do it for you across standard accounts.
Mini-exercise
Sketch your account map on one sheet of paper before you create anything in Stripe:
- Write your LLC's legal name and EIN at the top — that's the shared entity for every account.
- List every product you ship or plan to ship in the next year.
- Next to each, mark share (lives in your main account) or split (its own account). Use the table at the top of this chapter to decide.
- For each split product, write the four things it will need: secret key, webhook signing secret, price IDs, and Payment Link URL(s).
If you can fill that sheet in confidently, you're ready to click Create.
Challenges
- Decide the split. You ship three things: a paid Mac app (subscription), a free web tool with an optional one-time "tip," and an early-access beta of a brand-new app. Which share an account and which get their own? Justify each choice using risk isolation and branding, not just effort.
- Plan a parallel cutover. Your web tool currently bills 40 subscribers inside your main account. Write the day-by-day plan to move it to its own account using Strategy A, including exactly when each old subscription stops billing.
- Design the key namespace. You expect four products within two years. Write the full set of environment-variable names your Worker will need so that no two products' keys can ever be confused, and note where each secret is stored.
- Spot the double-charge. In a Strategy B migration, describe the precise sequence of API states (old subscription, new subscription) that would cause a customer to be billed twice in one month — then describe the ordering that prevents it.
Key Points
- One LLC can own many Stripe accounts. A Stripe Organization groups them under one login, one team, and consolidated reporting, while each account stays an isolated payments world.
- Split a product into its own account when it has its own brand, buyers, risk profile, or any chance of being sold — otherwise keep products together in one account.
- Organizations ≠ Connect. Connect pays out third parties; Organizations manages accounts you own.
- The entity is shared, the accounts are isolated — same legal name and EIN on every account, but separate payouts, Radar, branding, keys, and webhooks. Isolation without incorporation.
- You can't move a product between accounts in one click. Stripe copies Customers and cards on request; you recreate products, prices, and subscriptions yourself (the Billing migration toolkit helps).
- The cardinal rule of migration is never bill twice — cut over in reconciled batches and cancel-at-period-end on the old account as the new one goes live.
- Your app must treat each account as distinct: product-prefixed keys, per-account webhook verification, and per-account price IDs.
Where to go deeper
The official Stripe docs are the source of truth as features evolve:
- Stripe Organizations and supported organization setups
- Managing multiple separate accounts
- Billing for a multi-entity business
- Data that can be copied between accounts and recreating subscriptions after a copy
- Migrate subscriptions with the Billing toolkit
You now have the structure to ship a portfolio of products under one clean entity — each isolated where it counts, all rolling up to the single LLC on your tax return.
Ship your apps faster
When you're ready to publish your Swift app to the App Store, Simple App Shipper handles metadata, screenshots, TestFlight, and submissions — all in one place.
Try Simple App Shipper